Overview
- Prepare a KML file (using GoogleMaps or GoogleEarth, see details below)
- In QGIS, Add VECTOR DATA and under BROWSE, set files of type to "Keyhole Markup Language (KML)"
- Browse to the KML (not .kmz! file) that you want to import, then click OPEN
- Save the objects imported from KML to a Shapefile (or other format) for future use.
After importing KML to QGIS, Open the Attribute Table. Notice that only the NAME field has been imported EXACTLY as it was entered in the original KML! All the information saved in the DESCRIPTION section of the KML, has been saved as an array wrapped in tags, rendering the values USELESS for joining. Therefore, please consider the following section on creating KML files, which will enable you to join unlimited tabular data to your locations that were defined in KML.
Google MyMaps to Create KML
- Go to the URL: maps.google.com
- You must LOGIN to a Google Account to use MyMaps (a free map tool)
- After logging in click on MY PLACES, then type the placename of the location you want to create markers for
- Click CREATE MAP to launch the MARKER editing tool

- Before creating placemarks, enter a TITLE for your MAP on the left, then proceed to zoom in and create markers by clicking on the BLUE PLACEMARK tool
- One: click on the BLUE marker tool, then click at the point you wish to create on the map
- Two: after the Blue Marker has been pinned to the map, click on it to open the MARKER TITLE and DESCRIPTION form
- Three: enter a UNIQUE ID NUMBER into the TITLE form
- Four: enter a NAME or DESCRIPTION in the DESCRIPTION form, then OK to complete the Marker entry
- Five: repeat the Second to Fourth steps for each new point, using a different UNIQUE ID Number in the MARKER TITLE form for each point
- Six: when the set of points is complete, click DONE
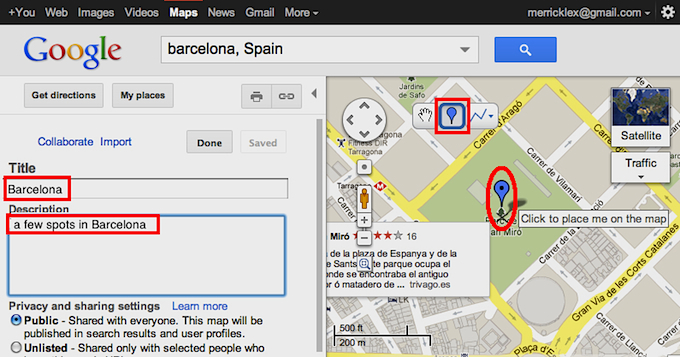
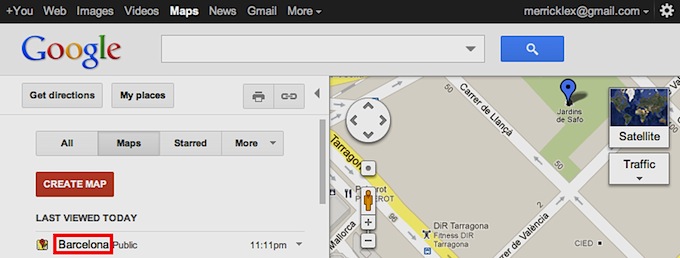
- Seven: now the Map Title and Points List should appear on the left, CLICK on the MY PLACES button
- Eight: at the top of the LAST VIEWED TODAY list, you should see the new Map, Click on this Map Link
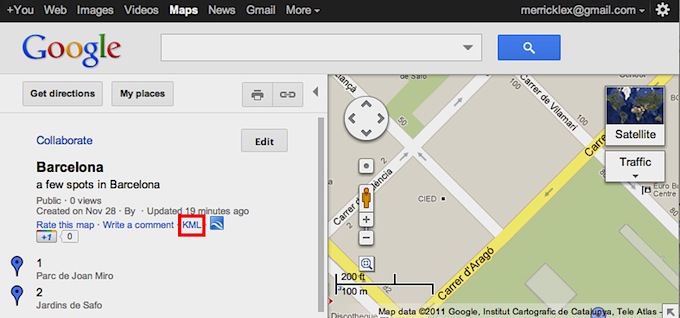
- Nine: a web page showing the points on the map will appear on the right, and on the left you should see a KML LINK below the map description
- Ten: right-click on the KML LINK and SAVE to your computer.
- Result: you now have a new KML file of your markers created with Google Maps.
Import KML file to QGIS
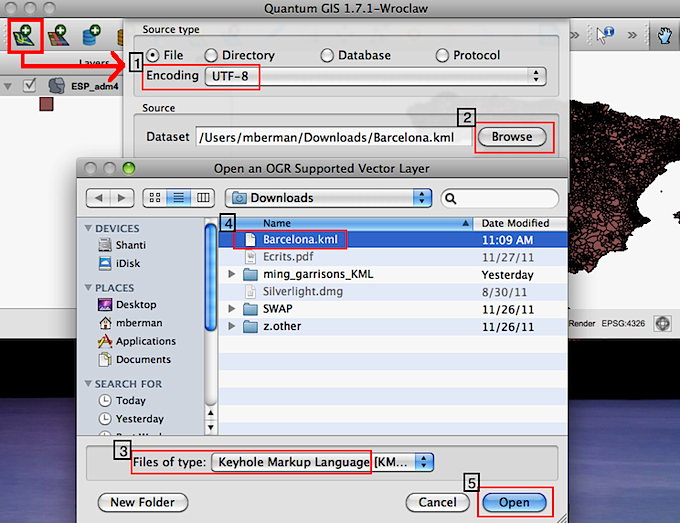
- In QGIS click on the Add Vector Data button
- First add some basemap data for SPAIN (the ESP_ADM4 data)
- Now click the Add Vector Data button again
- Set the Encoding = UTF-8 (the default encoding of KML format)
- Click on BROWSE and set the Files of Type = Keyhole Markup Language (KML)
- Browse to the KML file you created and click OPEN
Check KML layer position
- Right click on the imported KML layer in the LAYER LIST and ZOOM TO EXENT
- Click on the ZOOM OUT tool and click several times near the KML points until you can see the boundaries of the basemap layer (for SPAIN, in this example)
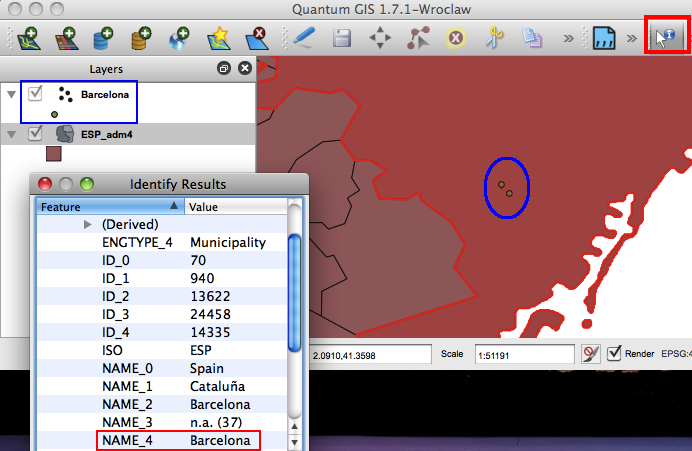
- Click on the IDENTIFY tool and click on the basemap feature that CONTAINS the KML points
- The Identified feature will now be highlighted in the MAP VIEW and the Identify Feature Popup Window will appear
- Examine the attributes to make sure the KML Layer points appeared in the correct Administrative area (in our example, Barcelona)
- You have successfully used Google Maps to create points, exported them as KML, and imported them to QGIS
- Right-click on the KML layer and SAVE AS as Shapefile for future use.
|


