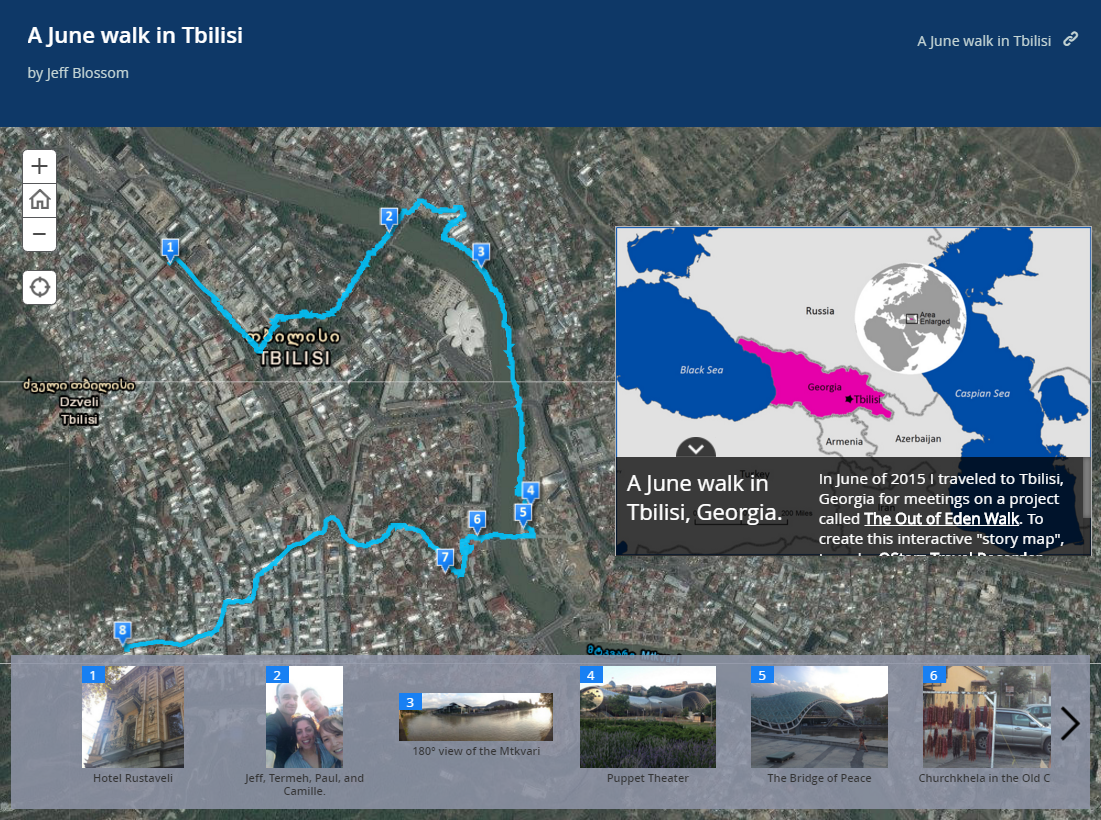
Displaying photos at the location of capture with narrative text on an interactive map is a powerful way to tell a story, or communicate a specific topic. This blog walks one through the steps to create a story map
that contains narrated, geotagged photos, and a GPS track like the one pictured below (click the image to visit the live site). To make your own story map all you need is a camera and a computer connected to the internet. However, using an iPhone or Android smartphone makes the process much easier.
To make a story map, you’ll need to capture geotagged photos and map your route. Let’s get started.
1) Enable geotagging of your photos.
If using a regular camera, make sure you note the locations where you take each photo on a notepad. You’ll locate them later using an online map. If using a smartphone, make sure your phone is set up for photo geotagging by following the steps below.
On an iPhone: Go to Settings > Privacy > Location Services, and set to On. On this screen make sure the toggle next to Camera is also set to On.
On an Android phone: Go to Settings > Personal > Privacy and Safety > Location, and set to On. Some versions of Android also allow access to Location by swiping down from the top. Then, on your Camera settings, choose Enable GPS.
2) Download the “Strava” mapping app
If you are not using a smart phone, you are ready to take your walk. After your walk, (making sure to note where your photos are taken) resume this exercise at step 6 below. If using a smartphone, follow the steps below, starting with 2a.
2a) First, create an account at Strava by going to https://www.strava.com/ and clicking the “Sign Up“ button.
2b) Next, on your smartphone, search for the app “Strava”. Download and install the “Strava Running and Cycling” app. After the App installs, log in with your account.
3) Start mapping.
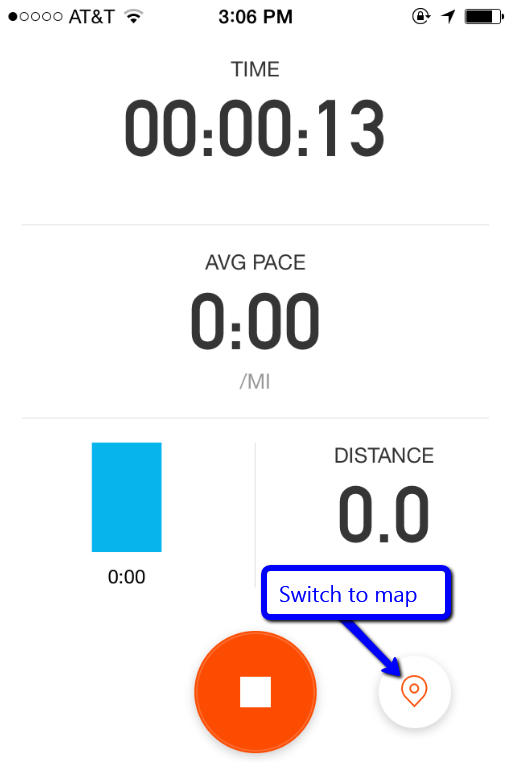
On your smartphone, open Strava and touch the Record button (on the bottom, in the middle), and then the Play button. You may have to tap”Start running” or “Start cycling” first. Now your phone’s GPS will record everywhere you go (it should look like the screenshot below when recording). To see where you are on the map, touch small button to the right (see blue arrow, below).
Now, it’s time to walk your route, and take pictures as you go. Make sure to take a picture near the very start of your trip, so your GPS route and photos will begin roughly in the same place.
4) Finish the walk.
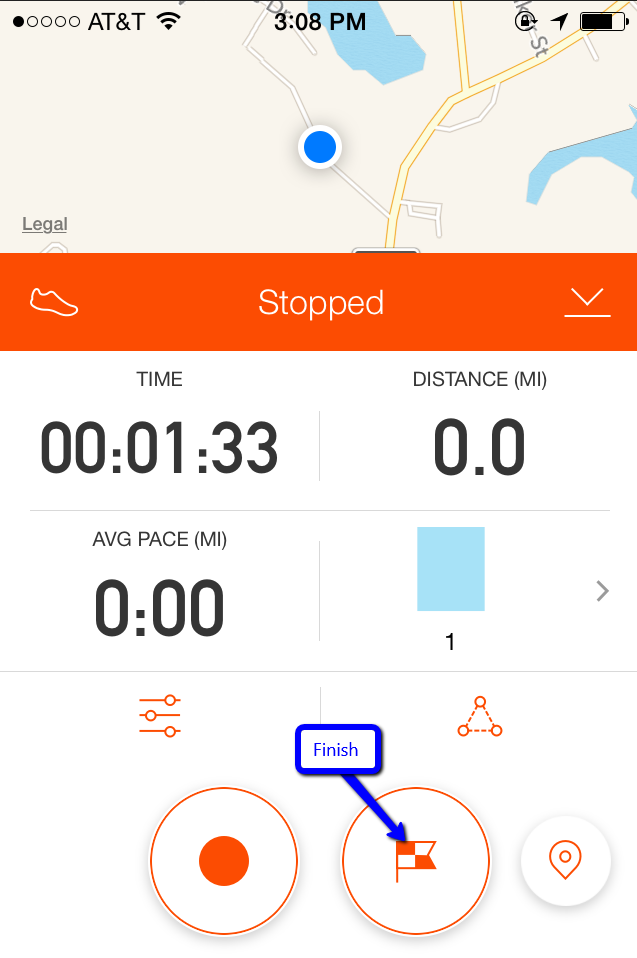
When finished walking, touch the Finish button on Strava (see blue arrow, below). Enter a name for your walk, Save, and tap Sync Activity. It will automatically upload the route to your online Strava account.
5) Download your route as a .gpx file.
“gpx” is the format GPS files are saved in, and now you’ll save your route in this format, for uploading to the map later.
On a computer, go to http://Strava.com. Click LOGIN at the upper right, and log in. Your “Activity Feed” will be displayed front and center. Click on the map that shows the route you mapped while walking to access this Strava route. Click the tools button: and choose Export GPX. This will save a .gpx file to your computer, into your Downloads folder. You’ll use this file later when making the map.
6) Upload the photos you took on the walk.
The easiest way to do this is using the Flickr app on your phone, explained in step 6a below. If you don’t have a phone or the Flickr app, do step 6b through 6g below.
6a) Download and install the Flickr app for your phone. Login if you already have a Yahoo! account. If not, click Get Started and create an account. In the app settings, choose Privacy and Safety and Location privacy, and set this to Anyone. In the app, touch the button that looks like a person in the lower right and choose Camera Roll and the Select button. Choose the photos you want to upload. Touch the Select Albums button (at the bottom, 2nd from the right), and click Create Album. Name the album, and the photos will upload.
6b) Save your photos to your computer, and open a web browser.
6c) Go to Flickr: http://www.flickr.com, and click Sign In to create an account (or log in if you already have one).
6d) Go to the Flickr privacy settings here: https://www.flickr.com/account/privacy/. Scroll down to the “Defaults for new uploads“ portion. Next to the “Import EXIF location data“ it needs to be set to “Yes“. If it’s not, click edit, and change it. Now you are ready to upload your photos.
6e) On Flickr, click the Upload button:![]() . Drag the photos you took on the walk from your computer onto the website.Flickr will recognize how many photos you added, and make a blue button in the upper right labelled “Upload xx Photos“. Click this button to upload.
. Drag the photos you took on the walk from your computer onto the website.Flickr will recognize how many photos you added, and make a blue button in the upper right labelled “Upload xx Photos“. Click this button to upload.
6f) Click You >> Albums >> and click the Create new album button:
Name the album. Your photos will appear on a film roll on the bottom of the page. Drag the ones you took on the walk into the album. Click the blue Save button in the lower left.
6g) Double click your new album. Click Batch edit and Change Geoprivacy. Next to the question “Who Can See Where These items Were Taken” click the button next to “Anyone“ and CHANGE PERMISSIONS.
Your photos are now ready!
7) Make the map.
Go to the ESRI Story Maps page: https://storymaps.arcgis.com/en/app-list/. Under the Story Map Tour description, click BUILD A MAP TOUR. When prompted to Sign in, login with your ArcGIS Online account. If you don’t have one, choose the “Free non-commercial public account” option. Fill out your information and click CREATE MY ACCOUNT.
Go back to ESRI Story Maps page and sign in with your account. Click the CONTINUE TO MAP TOUR BUILDER button.
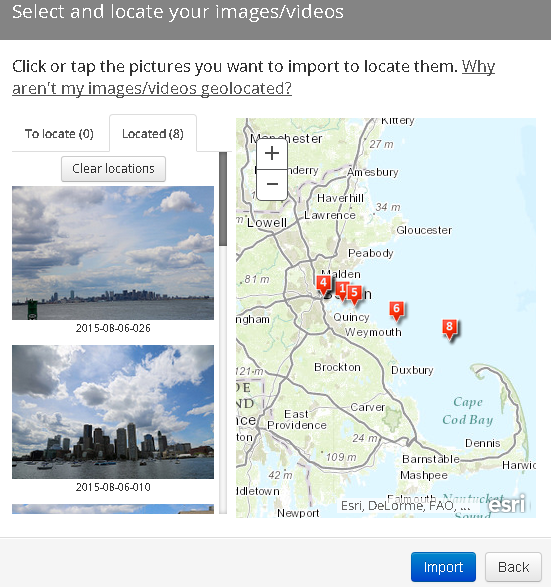
When prompted with “Where are your images or videos?” choose the Flickr icon: Enter your flickr user name and click Look Up. Under Select a Photo Set choose the album you created, and click Import. Photos that are geotagged will appear on a map like the one below. If using a regular camera, your photos will be listed as unlocated, and you’ll have to specify on the map where each photo was taken.
 .
.
8) Configure your map
Click the blue Import button, and your app will be created, and you will enter the Application Configuration interface. Here, by clicking the “Edit me!” prompts you can change photo titles, names, and descriptions. By clicking the Organize button you can rearrange the order your photos are numbered. You can also change the basemap and colors of the placemarks representing your photos. By clicking the SETTINGS button, customizations to the Layout, Colors, Header, Data, Extent, and Zoom Level can be made. Click the SAVE button often, as changes are not automatically saved. Click the SHARE button to share publicly so all can view.
9) Add your walking route.
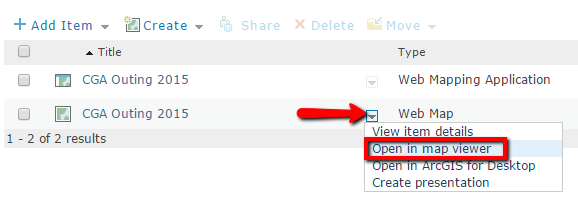
Go to ArcGIS Online: http://www.arcgis.com/. Click Sign in at the upper right, and sign in with your account. Once signed in, at the top, click My Content. You’ll see two items listed that have been created so far: A Web Mapping Application (your story map), and a Web Map (The map behind your story map). Click the arrow next to your Web Map (see image below, red arrow), and choose “Open in map viewer“ (red box below).
At this point, if you used your phone (or another GPS) to map your route, follow step 9a.
If you do not have a GPS track, follow step 9b to sketch in your route.
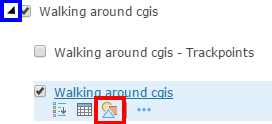
9a) In the Map Viewer, click Add >> Add Layer from File. Choose the .gpx file you saved back in step 5, and the route will be added to the map. To change the style of the line on the map, click the small arrow to the left of the check box on this layer to expand it (blue box, on image below). Hover your mouse over the layer’s name, and choose the Change Style button (red box, below):
Under Select a drawing style choose OPTIONS, and then click the Symbols button. Now you can change the color and thickness of your line. When finished configuring your line, click the Save button at the top. Go back to the Story Map your are building, and refresh the website, and your track should now appear on the map.
9b) Follow these instructions to sketch in your walking route.
First, zoom the map to the area where you walked.
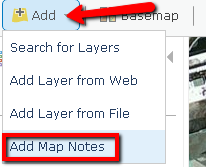
Next, click Add, and Add Map Notes (see below)
Enter a name for your map notes like “Walking Route” and click CREATE. Choose the Line feature type.

Now, click on the map at the start of your route, and keep clicking to define your route. Double click when finished. Click the CHANGE SYMBOL button, and choose your line width (usually thicker is better) and color. Click OK and Close to exit the editing window. Click Save to save your route. Go back to the Story Map your are building, and refresh the website, and your route should now appear on the map.
10) Share your story map
Click the SHARE button, and choose Share Publicly. A link to your map will display, that you can copy and send to anyone for viewing. You’re done!
For questions or problems with this tutorial, please click here to contact the CGA for help.
This tutorial is designed to get anyone on the fast track to creating a story map. It was based on a similar tutorial by the Geography is everything blog, which contains much more detailed information on how to theme and plan your walk or trip, photo editing tips, and more. Check it out for a more in depth experience.
no links
no file attachments