|
QGIS joins are temporary relationships between layers, or between tabular data (in .dbf or .csv formats) and spatial data layers. In this exercise we discuss preparation of the tabular data and the join process.
JOIN IDs
Before considering any table joins, the most vital aspect to consider is the JOIN FIELD. The join field must contain matching values (in the same format, such as STRING or INTEGER) in both the source table and the target layer. Placenames are usually NOT the best choice, because duplicates, capitalization, blank spaces, or other variations in the exact spelling used in either table will introduce many errors. Ideally, you want to use UNIQUE IDENTIFIERS for the values in the join field rather than placenames. For geospatial data, there are many standardized encoding systems that we can use for identifiers related to administrative divisions, such as FIPS Codes, or Chinese GBCODES, European NUTS codes, Japanese JCODES, and various other administrative coding systems. If you find that existing geographic codes do not work for your data, create your own set of UNIQUE IDs and don't alter them. Persistence of IDENTIFIERS help to keep your data organized and consistent.
Sample Tabular Data
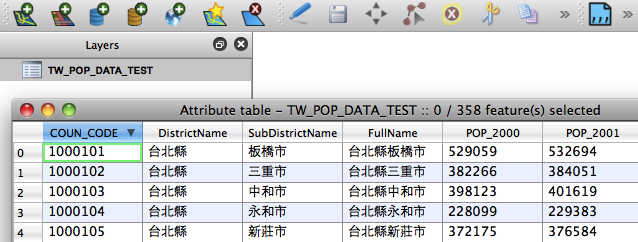
- Open the sample file /TW_POP_BIG5.csv in QGIS (with Encoding = BIG5)
- Right-click on the layer to Open Attribute Table
- Inspect the table contents to see if they look correct (readable characters, and no mixed data types in columns)
- Check our intended JOIN FIELD (COUN_CODE) to make sure it does NOT have NULL values or blank cells
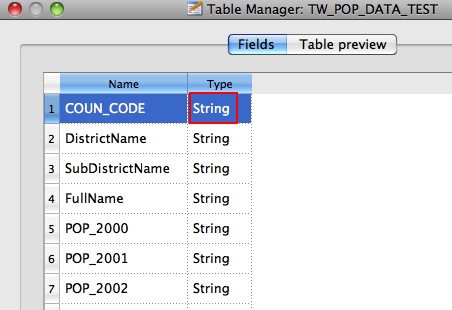
- Close the Attribute Table and go to the menu PLUGINS | TABLE | TABLE MANAGER
- Note the data TYPE for the JOIN FIELD (in this case QGIS imported the field as = String)
- If STRING is not the desired format for the field, you can assign you own values to each field when opening a .csv file in QGIS (see the following section on CSVT files)
- How to use a CSVT file to define field formats for a .csv file import
- In a text editor open the tutorial file: /TW_pop_BIG5.csvt
- You should see a single line in the file, like the following:
- "String(12)","String(20)","String(20)","String(40)","Integer(12)","Integer(12)","Integer(12)"
- Note that the first four fields are defined as STRING and the last three as INTEGER
- (You can modify the fields and types of fields to match the order that they occur in your .csv file. Each field definition is wrapped in double-quotes and separated by commas. No comma after the last field definition!)
- Now save the file with the SAME FILENAME as the .csv file being defined
- In this example, we saved the file as -> TW_pop_BIG5.csvt
- Make sure the file extension is .csvt, not .txt or some other default extension.
- In QGIS, when you add a .csv file that has an accompanying .csvt, it honors the formats defined in the .csvt!
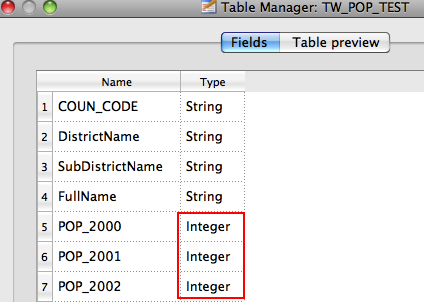
- Now add the same .csv file to your QGIS project, TW_pop_BIG5.csv, that has TW_pop_BIG5.csvt in the same folder
- Using your Plugins | Table Manager, take a look at the layer TW_POP_BIG5.csv
- The field formats should now be listed as defined in your .csvt file!
- More info on using csvt files here.
You may be tempted to open and view the .CSV table in EXCEL. Note, EXCEL may wreck the encoding. An all-around excellent tabular data & spreadsheet application is OpenOffice, which is freeware and runs on Windows, Linux and Mac. Other freeware branches of the same codebase, such as LibreOffice and NeoOffice are also excellent. Like QGIS, the OpenOffice programs enable the selection of a codepage, both at the time of OPENING the file, and at the time of SAVING the file.
Prepare Spatial Data Layer for Join
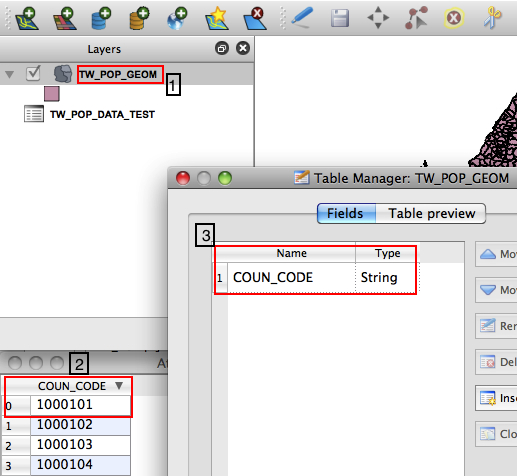
- Open the sample file /TW_pop_xian80.shp in QGIS (with Encoding = BIG5)
- Right-click on the layer to Open Attribute Table
- Inspect the table contents (in this case, there is only one field containing a UNIQUE ID)
- As with the Source Data table, browse the target spatial layer JOIN FIELD (COUN_CODE) to make sure it does NOT have NULL values or blank cells
- Close the Attribute Table and go to the menu PLUGINS | TABLE | TABLE MANAGER
- Make sure you know what the data TYPE is for the JOIN FIELD (in this case = String)
- If the Field Types look okay, close your Table Manager and Attribute Table windows
Join Operation
- The TARGET layer is the TW_pop_xian80 which currently only has the COUN_CODE field
- The SOURCE DATA file is the TW_pop_BIG5.csv layer, which contains attributes that we want to join to the spatial objects
- Inspect the table contents to see if they look correct (readable characters, and no mixed data types in columns)
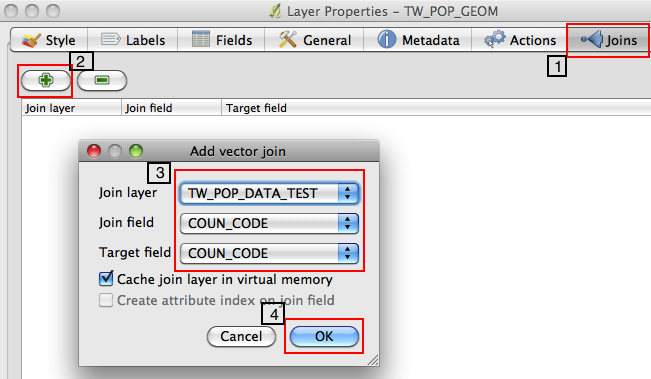
- Click on the TARGET Layer (TW_pop_xian80) to make it active, then right-click on that layer and select PROPERTIES
- In the Properties window, click on the JOIN tab, then the PLUS Sign button to ADD a JOIN
- Since we only have one other possible layer open, the drop-down will show our desired Join Layer: TW_pop_BIG5
- QGIS will make a guess about what the JOIN FIELD is (though in some cases you may need to select the correct JOIN FIELD name from the Source Data or the TARGET FIELD name from the Target Layer.
- Click OK to accept the settings for the join, then OK to create the JOIN
Check Join Results
- Right-click on the Target Layer (TW_pop_xian80) and Open Attribute Table
- The table should now contain all the joined attributes
- Close the Attribute table and right-click on the Target Layer and SAVE AS
- Select Format = ESRI Shapefile, Save As = TW_JOIN, Encoding = BIG5, CRS = Original CRS, then click OK
- Click OK when you see export to vector has been completed
- Click on ADD VECTOR DATA and add the new layer called TW_JOIN, with encoding = BIG5
- Right-click on the TW_JOIN layer to view the Attribute Table
- You should be able to see the joined tables in your new layer
- You will notice that the COUN_CODE Field is duplicated, one of them with NULL values. If you want to delete that FIELD called COUN_COD_1, go to the menu PLUGINS | TABLE | TABLE MANAGER and DELETE it. Accept the changes and you should have a cleanly joined table!
Another great CSV JOIN tutorial for QGIS 1.7.4 by Ujaval Ghandi: here |
